Technical Guide: Forming Station Working Principle & Tooling Installation (DPP Series)
04/09/2017
1. Thermoforming Working Principle
During operation, the forming web (e.g., PVC) is unwound and fed into the heating station, where upper and lower contact platens soften the material to a pliable state. The heated web then indexes into the forming station. Upon mold closure, high-pressure positive air (4 to 8 bar) is injected, expanding the material into the lower mold to form the blister cavities.
As the blister web contacts the chilled lower mold, it rapidly cools and regains rigidity, maintaining its precise volumetric shape after extraction.
Plug-Assist Mechanism: For complex geometries or deep-draw cavities, the station utilizes a mechanical “plug-assist” system. Teflon-coated plugs physically pre-stretch the warm PVC into the cavity before compressed air is applied, ensuring a highly uniform wall thickness distribution across the entire blister profile.
2. Lower Forming Mold Installation
Pre-installation Check: Verify that the lower mold’s exhaust ports are completely unobstructed. Blocked exhaust ports trap air and will result in malformed blisters.
The DPP260Ki-2 model utilizes a pneumatic cylinder system to securely lock the lower mold. To install:
-
- Turn the pneumatic control valve (located beneath the station) clockwise to release the locking mechanism.
-
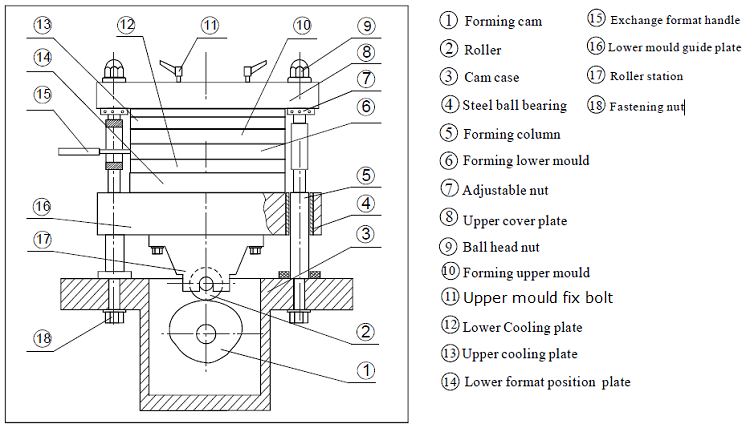
- Thread the installation handle (15) into the lower mold’s tapped hole.
-
- Align the lower mold’s T-slots with the cylinder piston and push the mold fully forward into the station.
-
- Turn the pneumatic valve counterclockwise to securely engage the cylinder lock.
3. Upper Forming Mold Installation
Pre-installation Check: Verify that the upper mold’s blowing ports are clear and that the perimeter silicone sealing ring is intact. A damaged seal will cause pressure leaks during the high-pressure forming cycle.
To install:
-
- Loosen the upper mold fixing bolt (11).
-
- Thread the installation handle (15) into the upper mold.
-
- Align the mold with the station’s upper guide grooves and push it smoothly into position.
-
- Tighten the fixing bolt (11) to mechanically lock the upper mold.
Forming Station Schematic Diagram