
Standard Operating Procedure: Thermoforming to Cold-Forming Changeover on DPP Series
04/18/2017
The standard DPP series Blister Packaging Machine is equipped with a thermoforming station. To produce cold-formed (Alu/Alu) blister packaging, customers must utilize dedicated change parts and a cold-forming mould assembly. The detailed procedure for installing the cold-forming change parts is as follows:
-
- Install the Eccentric Wheel Case (3):
Connect the eccentric wheel case (3) to the camcase (7) using the four screws located on the small column (28). Note that the eccentric wheel case (3) is supplied pre-assembled with the eccentric wheel (1), connecting rod (4), and small column (28).
- Install the Eccentric Wheel Case (3):
-
- Change the Forming Column (9.2):
Remove the existing thermoforming cover plate (14.1) and the thermoforming column (9.1). Proceed to install the dedicated cold-forming column (9.2).
- Change the Forming Column (9.2):
-
- Install the Tie Rods (26):
Insert the tie rods (26) vertically through the camcase (7) from top to bottom. Secure the two tie rods directly to the connecting rod (4).
- Install the Tie Rods (26):
-
- Install the Lower Forming Mould (18):
Using the hand barring gear, manually rotate the blister machine until it reaches its highest position (with the forming cam at its highest point). Remove the thermoforming lower mould from the lower mould guide plate (23). Position the baseboard (10), the cold-forming lower mould (18), and the pressing plate (12). Insert the positioning pin (19) through the press plate and lower mould to ensure strict alignment. Once perfectly aligned, secure the forming lower mould with screws, and then remove the positioning pin (19).
- Install the Lower Forming Mould (18):
-
- Install the Upper Forming Mould:
Install the forming punches (16) onto the pressing plate (12) one by one. Position the cold-forming cover plate (14.2) and connect it securely to the tie rods (26). Note: Adjusting the height position of this forming cover plate dictates the forming depth of the blister pocket (calibration procedures are detailed on the next page).
- Install the Upper Forming Mould:
-
- Install the Drive Chain (29) and Synchronize:
Connect the main spline shaft (27) to the eccentric shaft (30) using the drive chain (29). During chain installation, you must carefully adjust and correct the angle position of the eccentric wheel relative to the forming cam. Ensure perfect mechanical synchronization: as the forming cam drives the lower mould (18) upward to touch the press plate (12), the eccentric wheel must simultaneously drive the forming punches (16) downward to elongate the aluminum film and properly form the blister.
- Install the Drive Chain (29) and Synchronize:
Schematic Diagram: Thermoforming vs. Cold-Forming Station
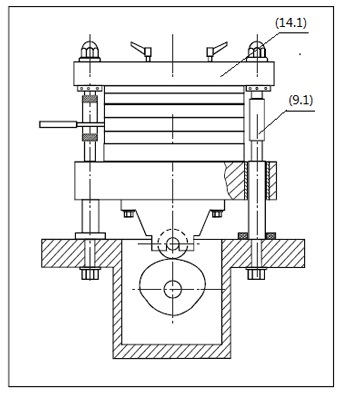
Thermoforming Station
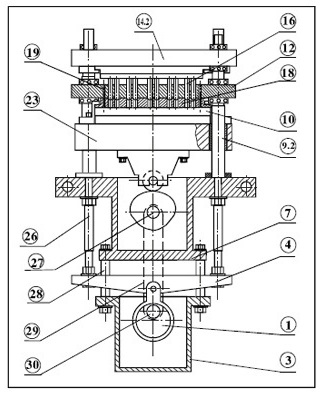
Cold-Forming Station