
How to Operate the HMI Touch Panel on a DPH Blister Packaging Machine?
11/24/2019
The Human-Machine Interface (HMI) is the command center of the DPH series Blister Packaging Machine. Mastering its touch panel and physical controls is essential for ensuring smooth pharmaceutical production, precise parameter adjustments, and accurate fault rejection.
This guide provides a comprehensive walkthrough of the machine’s control panel, from initial startup to advanced encoder and discharging settings.
1. Physical Controls and the Initial Interface
Alongside the virtual touchscreen, the DPH series retains essential physical buttons on its aluminum control enclosure for safety and quick access:
- Emergency Stop Button: In an emergency, you must push the emergency stop button to stop the blister machine. Rotating the button clockwise can lift the emergency stop, and the blister machine will re-enter standby mode.
- Run & Stop Buttons: Frequently used for standard operation without needing to navigate the touch menus.
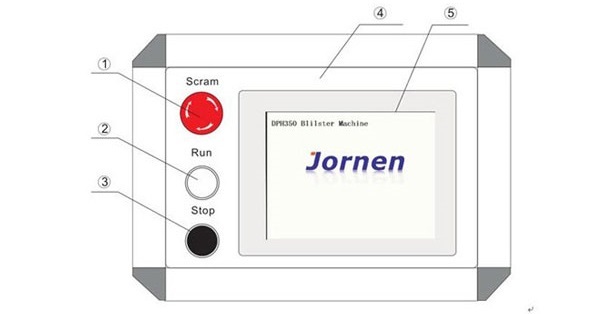
DPH series Blister Packaging Machine-figure1
The Initial Interface
Upon powering up the blister machine, the screen displays the Jornen trademark and the machine model.
- Click anywhere on the screen to trigger the maintenance reminder: “Add lubrication oil once a week.”
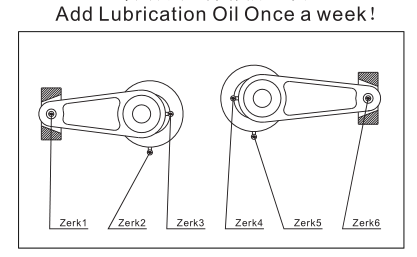
DPH series Blister Packaging Machine- Figure 3
- Click again to enter the Main Menu, which provides access to: DOOR ALARM, AUTO INTERFACE, ADJUST INTERFACE, and DATA INTERFACE.
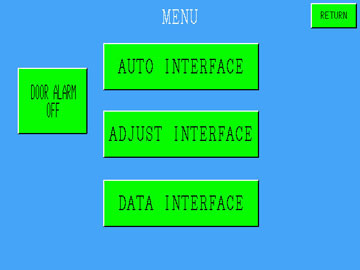
2. AUTO INTERFACE: Daily Operation Controls
Clicking AUTO INTERFACE brings you to the main operational dashboard. Here, operators can monitor and adjust real-time production parameters:
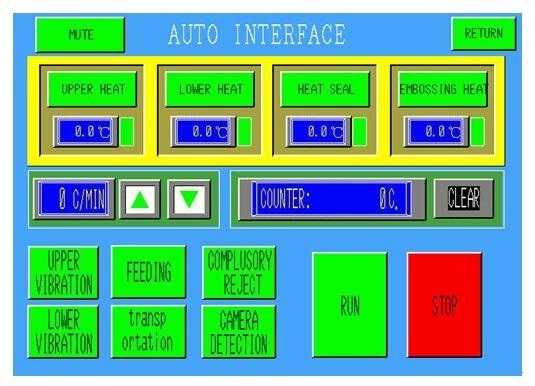
DPH Blister Packaging Machine-figure5
- Upper & Lower Heat: Controls the temperatures of the upper and lower forming heating plates. Clicking these enters the data interface for adjustments.
- Heat Seal: Controls the sealing temperature.
- Machine Speed (__/minute): Use the up and down arrows to adjust the running speed of the blister machine.
- Output Count: Automatically accumulates production data. Click “CLEAR” to reset the counter.
- Upper Vibration: Controls the linear vibratory conveyor that transfers tablets from the hopper to the disk vibratory feeder.
- Lower Vibration: Controls the disk vibratory conveyor, moving tablets in a circular motion for pocket feeding. (Read more about the Track Feeder here).
- Feeding: Toggles the blister feeding mechanism on or off.
- Compulsory Reject: When activated, the machine rejects all blister cards after punching, regardless of quality. This is typically used during testing phases or when the downstream cartoning machine is not yet ready.
- Camera Detection: Activates the vision inspection system to identify missing or defective tablets.
- Run / Stop: Virtual buttons to start or halt production.
3. DATA INTERFACE: Advanced Parameter Settings
The Data Interface contains four distinct pages for precise machine calibration.
Page 1: Core Dimensions and Temperatures
- Forming L (Forming Index): Defines how far the material advances per stroke (e.g., setting it to 200 means a 200mm advance). This must match your specific forming mold. (Details on setting forming index here).
- Cutting L (Cutting Index): Sets the rotation angle of the cutting roller. For example, a setting of 60 means the roller rotates 60 degrees per cycle. (Details on punching station here).
- Temperature Settings (Reference Only):
- Upper/Lower Forming: 130–140°C
- Seal: 230–265°C
- Emboss: 100°C
(Note: Actual temperatures depend on room temperature, material quality, machine speed, and chiller performance.)
- Blister Stroke Counting (Rejection Timing): This defines the number of web strokes it takes for an empty pocket to travel from the camera inspection to the punching station.
- Crossing Type Cutting: Blister rows are offset. For example, if cards 1, 3, 5 take 100 strokes to reach the punch, cards 2, 4 will take 99 strokes.
- Aligned Type Cutting: All cards are aligned. Set the same stroke number for all cards (1–5).
- Speed Ratio: In high-speed machines, the punching station runs at a multiple of the forming station’s speed. To calculate: Divide the number of blisters formed per cycle by the number punched per cycle (e.g., 12 formed ÷ 4 punched = a ratio of 3). An incorrect ratio will cause faulty cutting and inaccurate speed displays.
- Servo Speeds: Usually set at 400. For unusually long blister cards (e.g., index > 120mm), this speed may need to be increased to drive the webbing adequately within the cycle time.
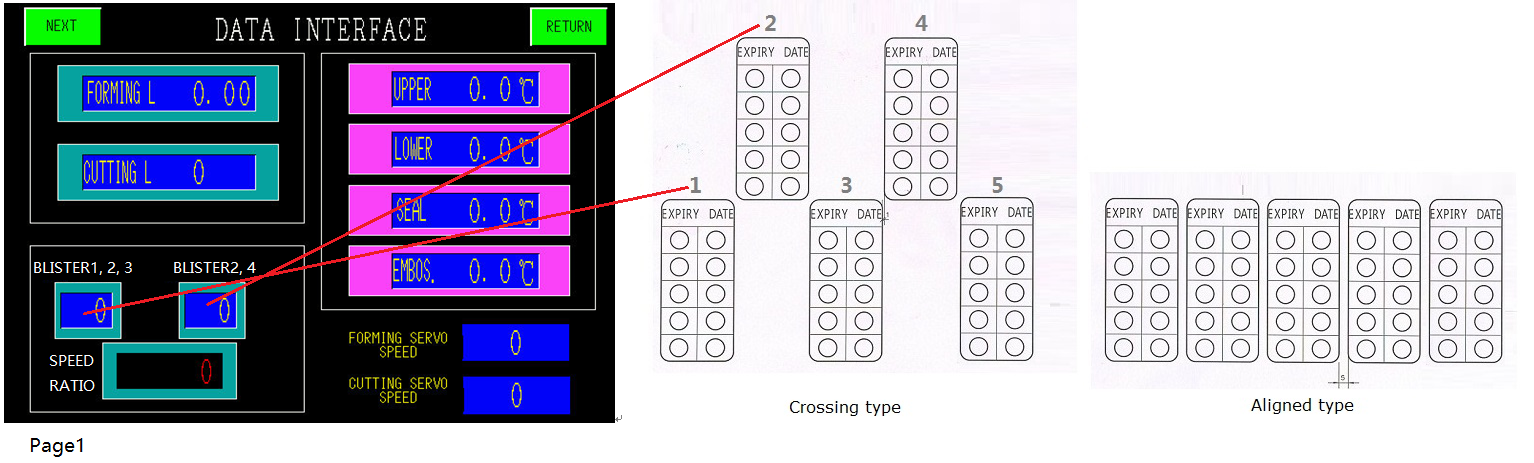
Blister machine data interface page1
Page 2: Encoder Position Points
The encoder on the forming camshaft features 4,096 position points per revolution, sending critical timing signals to the control system. Operator Tip: Inch (jog) the machine manually to the desired mechanical position to read the current encoder point before setting these parameters.
- Blow On / Off: The points at which compressed air starts and stops blowing into the forming mold.
- Feeding On / Off: The timing for dropping tablets into the blister pockets.
- Forming / Cutting Index On: The exact moment the indexing devices start pulling the web.
- Machine Stop Point: Ensures the machine halts at a specific mechanical position (e.g., right after forming) to prevent material waste upon restarting.
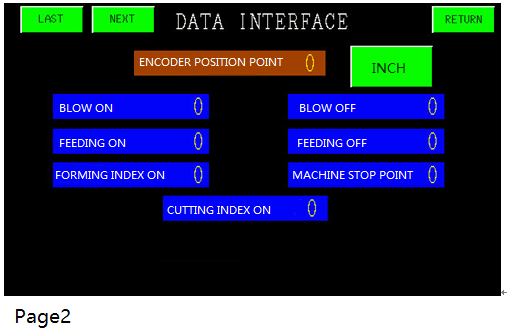
Blister machine data interface page2
Page 3: Robot Arm Discharging Configuration
The DPH series uses robotic arms with vacuum cups (e.g., 3 or 4 sets) to collect punched blister cards, rotate them 90 degrees, and discharge them onto a conveyor.
- To set this, inch the machine until the robot arm turns 90 degrees horizontally. Note the encoder number.
- DISCHARGE ON: The point where the vacuum is released, dropping the card onto the conveyor.
- DISCHARGE OFF: The point where vacuum force is restored to prepare for the next cycle.
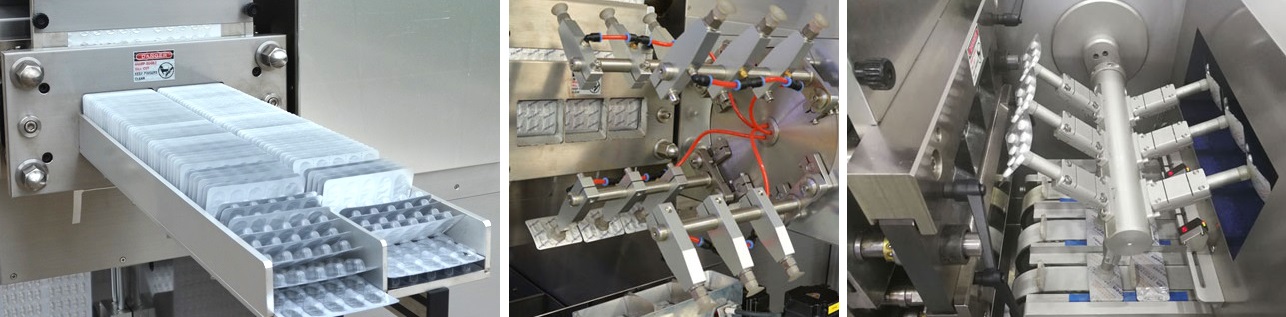
Blister cards discharging
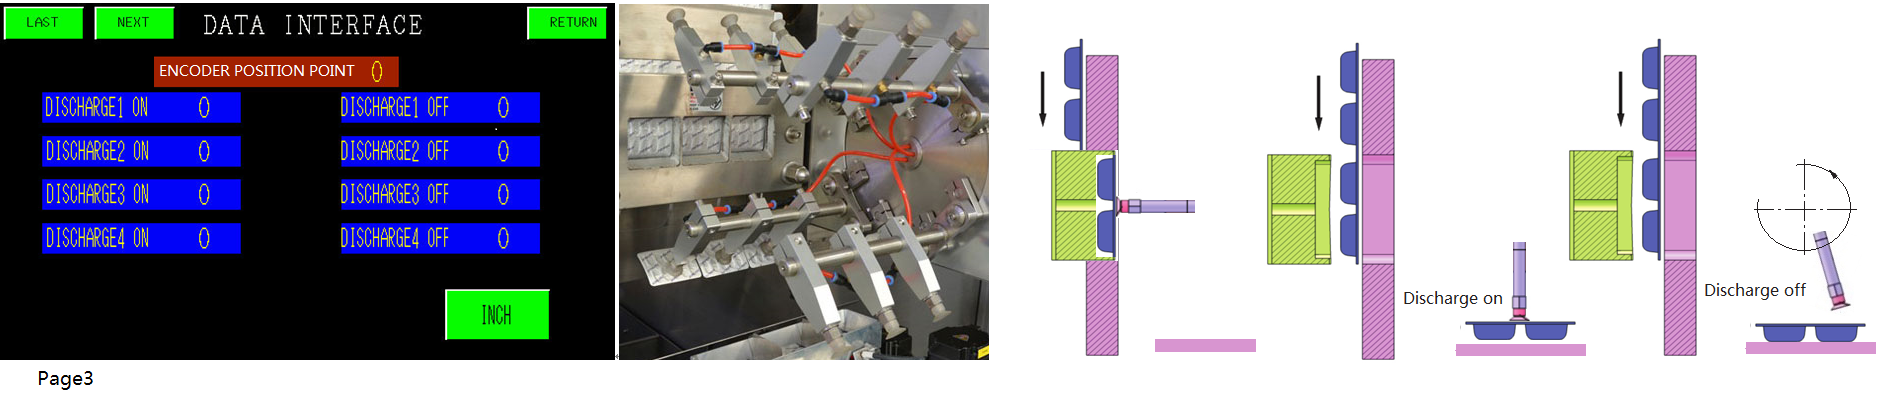
Blister machine data interface page3
Page 4: Defect Rejection Settings
Based on the stroke count set on Page 1, the system knows exactly when a faulty card reaches the robot arm.
- REJECTION ON: As the arm picks up a faulty card and rotates 45 degrees (before reaching the horizontal discharge position), the vacuum stops, dropping the defect into a scrap bin.
- REJECTION OFF: Vacuum force is regained.
- Over-Sealed Rejection: If the machine pauses, the material lingering in the sealing station becomes “over-sealed” (burned or deformed). Activating this function automatically calculates the strokes and rejects these specific cards once they reach the punching station.
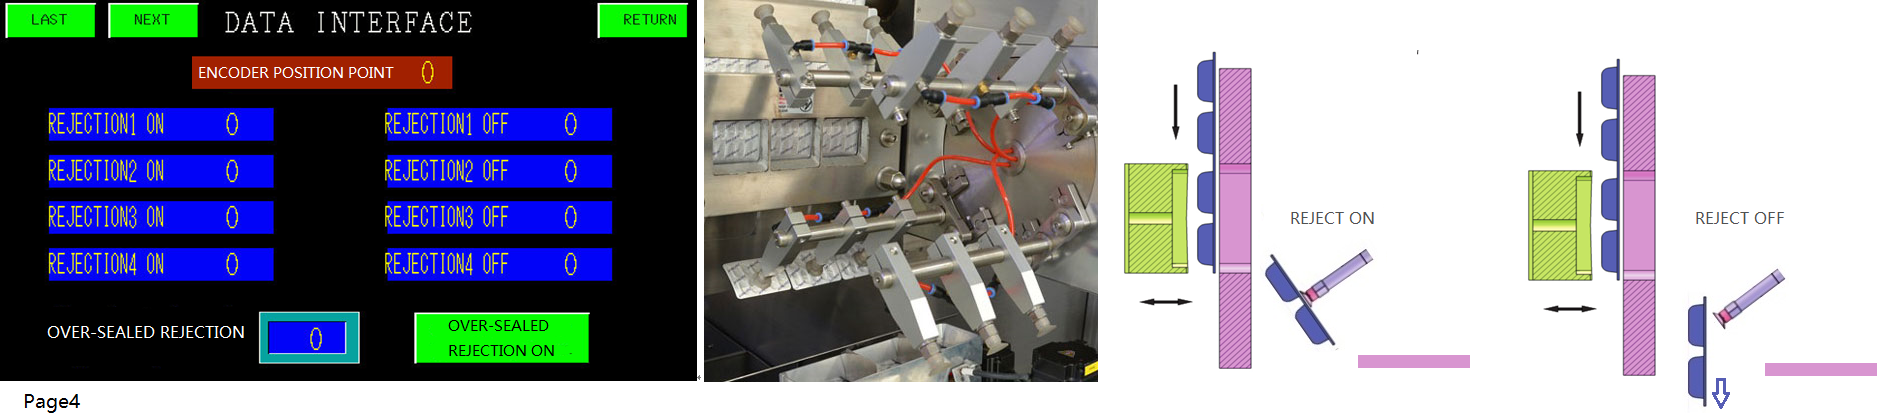
Blister machine data interface page4
(Jornen Machinery)