DPH series Blister Machine HMI touch panel
11/24/2019
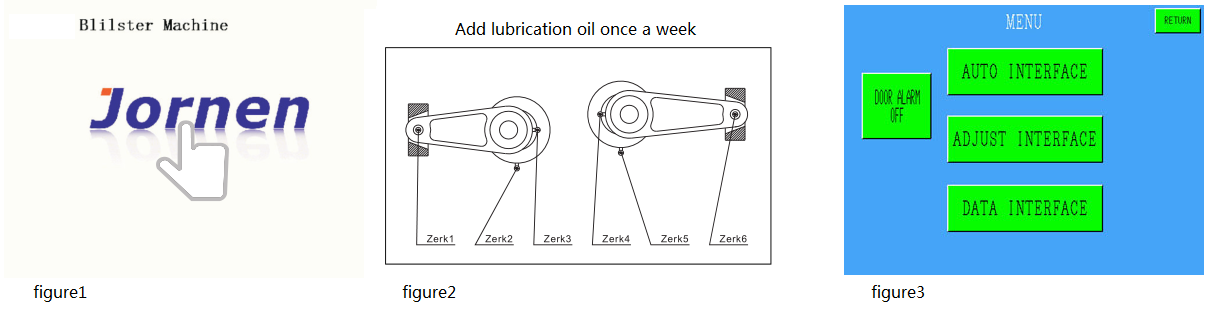
DPH series Blister Packaging Machine HMI touch panel (figure1)
1. Emergence stop button
In an emergency, you must push the emergency stop button to stop the blister machine. Rotating the button clockwise can lift the emergency stop, and the blister machine will re-enter standby mode.
2. Run button
3. Stop button
The Run and Stop buttons are frequently used, along with the virtual buttons inside the touch screen. This blister machine also places the physical buttons on the panel for convenient operation.
4. Aluminum control enclosure
5. Color touchscreen user interface
The HMI is automatically logged into the interface when the machine is connected to the power supply (figure2).

Blister Machine HMI
INITIAL INTERFACE
1. When turned on the power to operate the blister machine, the initial interface shows the model name of the blister machine, a trademark of the Jornen (figure1).
2. Click anywhere on the initial interface, and the interface shows the reminder of add lubrication: Add lubrication oil once a week (figure2)
3. Click the screen again and transfer to the menu selection page (figure3). It shows:
DOOR ALARM
AUTO INTERFACE
ADJUST INTERFACE
DATA INTERFACE
The initial interface of the blister machine
AUTO INTERFACE
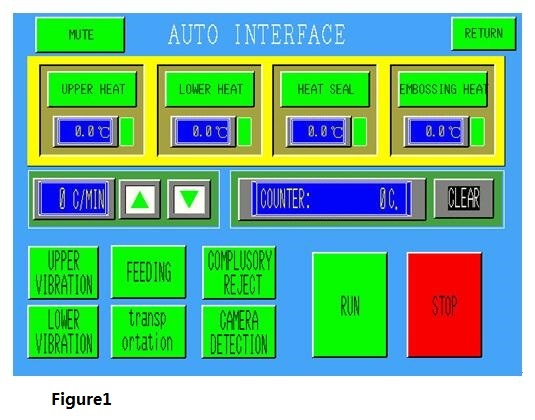
Click the AUTO INTERFACE button, and the blister machine enters the operation page (figure 1).
The AUTO INTERFACE shows the blister machine’s operation parameters and operation buttons.
Upper heat: the forming upper heating plate temperature; click this button can enter the date interface to set data (figure2).
Lower heat: the forming lower heating plate temperature; click this button can enter the date interface to set data
Heat seal: the sealing temperature; click this button to enter the date interface to set data
Machine speed: __/minute; click the upper and lower buttons to adjust the blister machine speed
Output count: when the blister machine is running, it automatically accumulates the output; click the “CLEAR” can remove the data.
Upper vibration: Blister feeding begins by transferring the tablets into the hopper. The upper vibration button controls the linear vibratory conveyor, which transfers the tablets from the hopper to the disk vibratory conveyor.
Lower vibration: control the disk vibratory conveyor, which moves the tablets in circles.
(see page: https://www.jornen.com/company-news/faq/dph-series-blister-machine-track-feeder/ ).
Feeding: control the blister feeding
Compulsory reject: if you turn on this button, the blister machine will reject any blister cards after punching, regardless of good or faulty blister cards. Usually, this function is used in the testing period or on the production line when the subsequent cartoning machine is not ready yet.
Camera detection: turn on this button, and the blister machine’s camera detection system starts to work.
Run: click it to run the blister machine.
Stop: click it to stop the blister machine.
DATA INTERFACE
The data interface of this blister machine has 4 pages
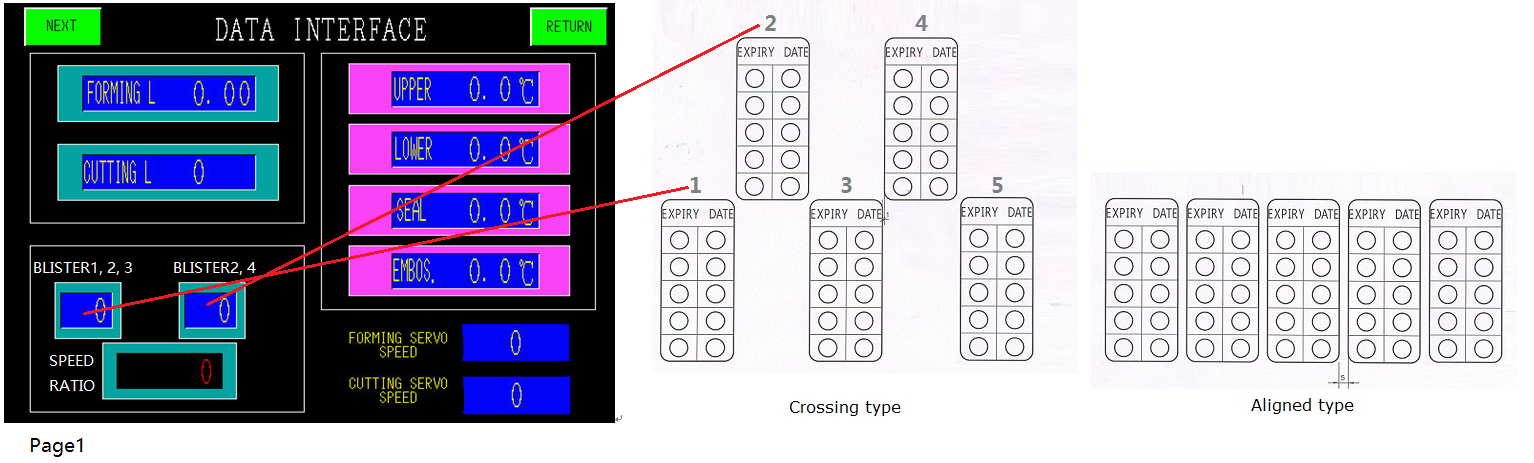
Data Setting in Page1:
Forming L: The data of the forming index; for example, if we set 200 here, the forming material will move 200mm at a time, the length of the forming index depends on the forming mold, then install a new forming mould, we need to set and adjust the length of the forming index to meet the forming mould parameter, the details of setting forming index, please see the page:
www.jornen.com/company-news/faq/dph-series-blister-packaging-machine-forming-traction-length/
Cutting L: The data of the cutting index; in this blister machine, the cutting index is a roller, and the data we set here is the rotation angle of the roller; for example, if we set 60 here, the roller index rotate 60 degrees at a time, the details of setting the cutting roller index, please see the page:
www.jornen.com/company-news/dph-series-blister-machine-the-punching-station/
Upper: Forming upper heating plate temperature, generally set at 130-140℃
Lower: Forming lower heating plate temperature, normally set at 130-140℃
Seal: Sealing temperature, normally set at 230-265℃
Emboss: Embossing temperature, normally set at 100℃
The above parameters are for reference; in actual production, it can be affected by so many aspects, such as the surrounding temperature, the quality of packaging materials, the machine speed, the size of the blister, the temperature of the water chiller, etc.
Blister1, 3, 5 and blister2, 4:
The number of strokes after being identified as an empty pocket, the web strokes that drive the empty pocket from the camera inspection to the punching station are referred to as “the number of strokes.” The web distance between the camera and the punching station is certain. The operator needs to carefully calculate the number of strokes in advance and set it through machine’s HMI, if the data is incorrectly set, the rejection mechanism will reject blister cards wrongly.
There are two types of cutting methods: aligned type and crossing type. If this blister machine adopts the crossing type, then we need to figure out the stroke number for blister cards1, 3, 5 and blister cards2, 4 respectively; for example, if the stroke number between the camera and the blister cards1, 3, 5 is 100, the stroke number set for the blister cards2, 4 will be 99, because this row of blister cards is one stroke closer to camera compared with the 1, 3, 5 blister cards.
If this blister machine adopts an aligned type, the data will be the same between blister cards 1-5, so please set the same data both in blister cards 1, 3, 5 and blister cards 2, 4.
Speed ratio: in this high-speed blister machine, the speed between the punching station and the forming station is different; the punching speed is multiples of the forming’s; how do we figure out the speed ratio?
Check the quantity of blister cards between the forming mold and punching mold; for example, if the forming mold forms 12 blister cards every time and the punching mold cuts 4 blister cards every time, the speed ratio is 12/4=3. The speed ratio normally is 2-5; it depends on the blister card size and layout of the forming mold; the smaller the blister card size, the bigger the ratio will be, and the bigger the blister card size, the smaller the ratio.
When installing a new mold, please check the speed ratio, then set it here. If set incorrect data, it will cause 2 problems:
(1) The cutting roller index will run incorrectly because the running frequency of the roller index is controlled by an encoder installed in the forming station shaft.
(2) The machine speed shown in the auto interface will be incorrect.
Forming servo speed and cutting servo speed: the running speed of the servo motors that drive the forming index and cutting index. The data normally is 400 and does not need to be reset, but for some blister cards with long sizes, such as the index reaching up to 120mm, we may need to increase the speed accordingly because the current speed may not be enough to drive such long webbing in a unit time.
Blister machine data interface page1
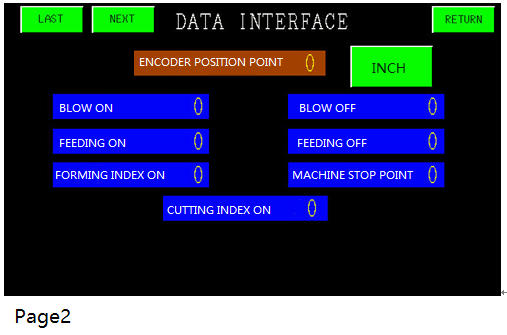
Data Setting in Page2:
Encoder position point:
A digital number shows the current position point of the encoder installed in the forming camshaft. When the camshaft rotates, the encoder sends signals to the blister machine’s control system for the action of air pressure forming start and end, products feeding start and end, forming index start, cutting index start, etc.
There are totally 4096 points around the encoder’s axis, it means the encoder can maximally send 4096 signal once it turns a circle. Operator need to select the right points for the action of forming, feeding and indexing, etc.
Inch: When setting data, the operator must inch the blister machine. For example, inch the machine to a position where the upper and lower forming molds are closed, then see the digital number shown in the encoded position point. This digital number can be selected as the start of air pressure forming.
Blow on: the digital number of the encoder position selected as the time to blow compressed air into the forming mold.
Blow off: the digital number of encoder position that is selected as the time to stop compressed air in the forming mold.
Feeding on: the digital number of encoder position that is selected as the time to feed tablets into the blister pocket (for dedicated feeder, the universal feeder doesn’t need the setting)
Feeding off: the digital number of the encoder position that is selected as the time to stop feeding
Forming index on: the digital number of encoder position that is selected as the time to starts the forming indexing, it means, at this point, the indexing device need to pulls the formed wed out of the forming mould.
Machine stop point: when turning off the blister machine, some operators may need the machine to stop at a specific position, such as the forming material was just formed inside the forming mold, so when re-start the blister machine, there will be no defects in the first blister forming
Cutting index on: the digital number of the encoder position that is selected as the time to start the cutting indexing; in this high-speed blister machine, the cutting shaft running speed is multiples of the forming camshaft; the encoder is installed in the forming camshaft, it means the encoder will send multiple signals to the cutting indexing once it turns a circle. How many times will it be sent? It depend on the data we set the Speed Ratio in the data setting page1, if set incorrectly, the encoder will send wrong signal.
Blister machine data interface page2
Data Setting in Page3:
This blister machine has various of way to discharge blister cards after punching, such as, collects the blister cards in magazine, robot arm with 4 sets vacuum cup or robot arm with 3 sets vacuum cup, etc. see the figure below.
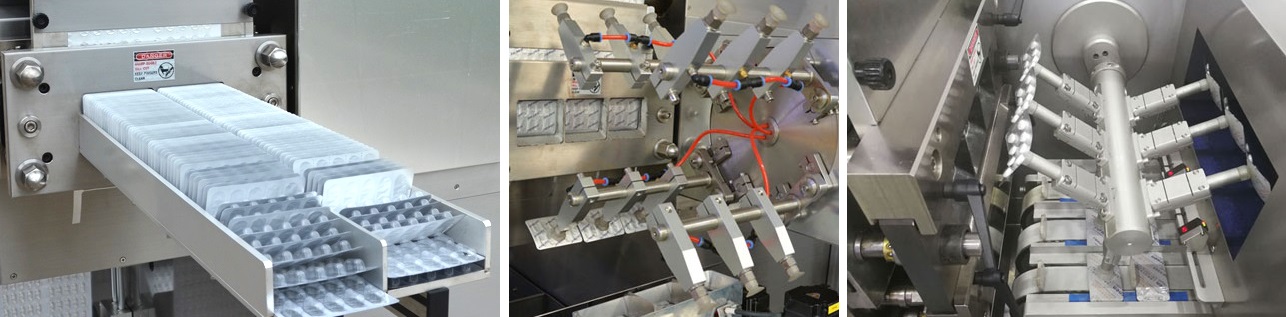
Blister cards discharging
Here, we take the robot with 4 sets of vacuum cups as an example to set the discharging data. After punching, the blister cards are pushed out by the convex die; at this point, a robot arm will collect the blister cards by its vacuum cup and turn 90 degrees, moving the blister cards into a horizontal position, then discharge them on a conveyor.
To set the data to make the robot discharge the blister cards synchronously with the punching station, we need to inch the blister machine. When the robot arm turns 90 degrees and moves the blister cards into the horizontal position, at this point, please see the current position point of the encoder input this digital number in the field of DISCHARGE1 ON; Inch the blister machine to drive the robot arm a little bit more, collects the current position point of the encode, input this digital number in the field of DISCHARGE1 OFF. Use the same method to set the data for robot arm 2-4.
DISCHARGE ON: the digital number of encoder position points selected as the time to stop the vacuum force, so the vacuum cup discharges the blister cards on the conveyor.
DISCHARGE OFF: the digital number of encoder position points selected as the time to regain the vacuum force for the vacuum cup.
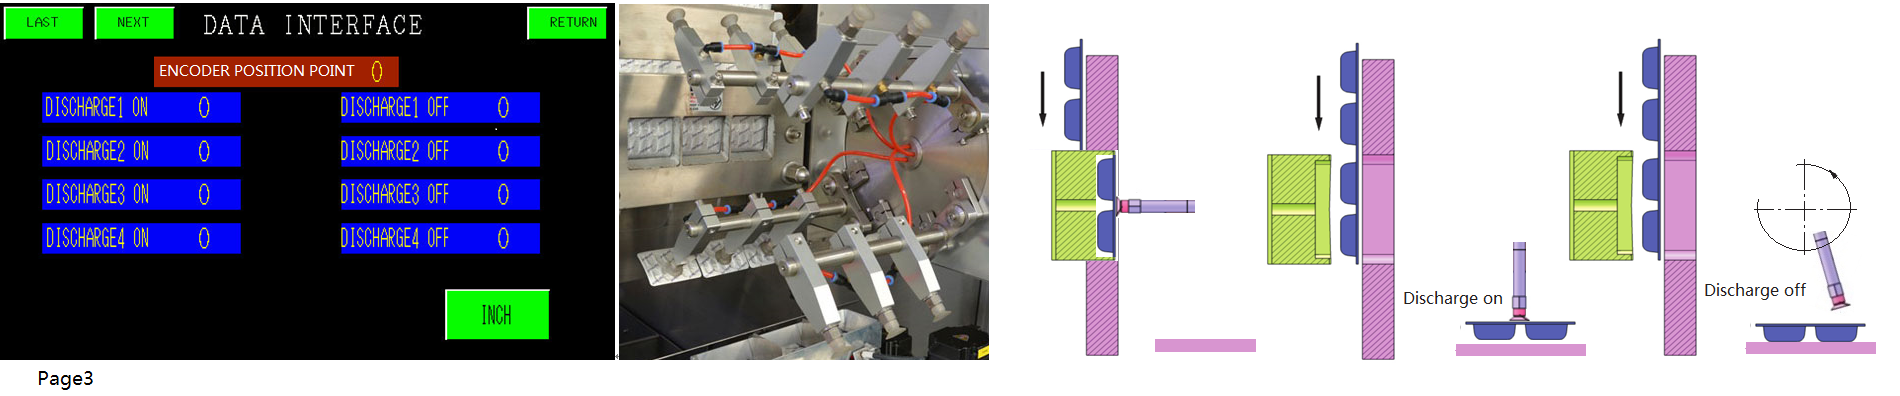
Blister machine data interface page3
Data Setting in Page4:
On this page, we set the time point of rejection for faulty blister cards. We have set “the number of strokes” on page1; After being identified as faulty blister cards, the blister machine’s control system began to calculate the stroke; when the faulty blister cards arrived at the punching station and were punched out, the robot arm picks up the faulty blister card by its vacuum suction cup ( described in page3 setting); When the robot arm turn the faulty blister card 45 degree (before 90 degrees into horizontal position), at this point, starts the REJECTION ON action to stop the vacuum force in the suction cup, so the faulty blister card falls down into the container.
To set the time point, we need to inch the blister machine to a position where the vacuum suction cup picks up the blister cards and turns around 45 degrees. At this point, see the “ENCODER POSITION POINT,” select this digital number, and input it in the field of “REJECTION ON” Inch the blister machine a little bit more, select the digital number as the time point for the “REJECTION OFF”, the rejection off action will regain the vacuum force for the suction cup.
Use the same method to set the data for REJECTION1-REJECTION4.
REJECTION ON: the digital number of the encoder position point that is selected as the time to stop the vacuum force, so the vacuum suction cup rejects the faulty blister cards into a container.
REJECTION OFF: the digital number of the encoder position point that is selected as the time to regain the vacuum force for the suction cup.
OVER-SEALED REJECTINON: if stop the blister machine for a while and restart it again, there will be an over-sealed defects on the webbing, operator can set “the number of stroke” here to order the blister machine’s control system to reject these blister cards after punching.
OVER-SEALED REJECTION ON: press this button to turn on the action (the field turns to red).
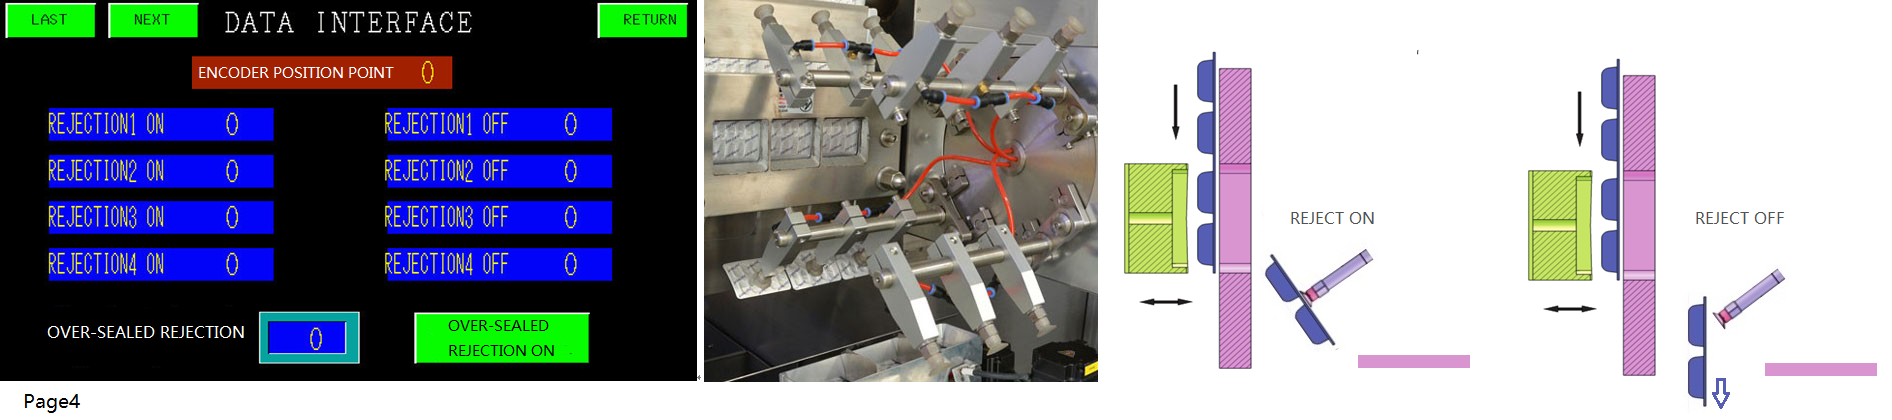
Blister machine data interface page4